- Lord Holmes, the Royal Assasin, from the Club, by Remy Tremblay: This amazing sculpture is the first collaboration of Remy Tremblay for the company SmartMax and their Steampunk line, SMOG.
- Ihllus, by Pedro Fernández : Sculpting process for this Enigma miniature by Pedro Fernández, right out from the blog of Rafa Coll.
- Sigmar's Priest, by Franciuus and Numitone : Mauricio Numitone has tried going into fantasy this time and he has sculpted this Sigmar Priest in 54 mm which he have Francesco Farabi to be painted. This is the result, Best of Show in Lugdunum, Lyon 2011.
- Verthandi, painting tutorial by Anna Machowska : Very nice tutorial article by our friend Anna. Check out how mummy does his painting while raising a Balrog at home! XD
- Welcome to the Jungle, by Paul Valenx :
We know that Paul usually puts a great deal of work into his dioramas. Well, this time he has overcome himself. A wonderful luxury of green life in this jungle diorama which is the real star in his last creation. Do not miss it. - Ar-Fiach from Studio McVey : Another amazing new miniature from Yannick released by Studio McVey. I really love their faerie collection, if only they weren't so expensive!
- Black Jack from Scale75 (Banshee) : Alfonso Giraldes published this great article on how he painted this new miniature from Scale75 (in spanish).
- Red Skull from Knightmodels(Banshee) : And another great article, this time about this amazing new miniature by Knightmodels sculpted by Paul Deheleanu. What a great tutorial! Again, in spanish.
- Sgt. Connor by Freeman, Andrea Miniatures : Andrea is releasing a new sci-fi line which starts with this amazing and huge Space Marine sculpted by Joaquín Palacios.
- Sgt. Connor Serpertan HI, Elías Alonso : And this is Elías Alonso's painted version of Sgt. Connor. Check it out! Elías is the best!
- Imperial Guard Bust (Historical) by Paul Deheleanu : It's amazing to see the quality of Paul's sculpts, this one's another 1/10 scale bust from him, this time for Michael Miniatures.

Thursday, March 31, 2011
Do Not Miss: March 2011
Seen on the internet on March 2011:
Wednesday, March 30, 2011
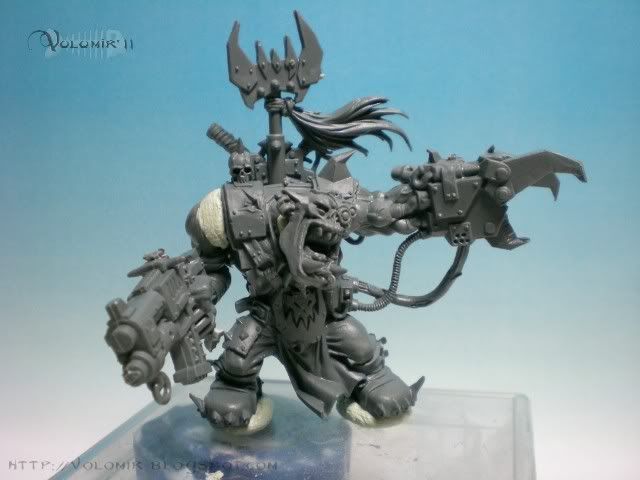
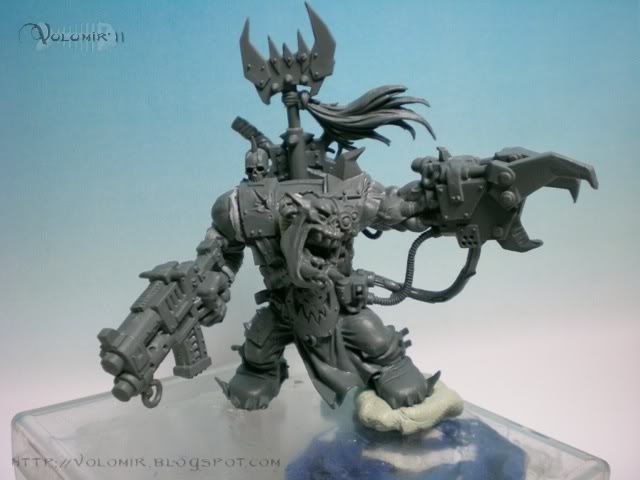
WIP: Ork Chieftain Part 1
This is another little project I am working on at the moment. It's an Ork Chieftain which I started two years ago and left to be painted on my shelf until recently, when I decided to finish it. So this first part of the process is the conversion work I did long time ago, and I will update later with some pics of the colour job.
This project started with the release of the Warhammer 40,000 boxed set (Assault on Black Reach). This box has an amazing number of miniatures and inside we find this cool Ork Warboss which I thought deserved some slight conversion to enhance its beauty.
The original figurine is this one:

As you can see, the pose is very simple, the body stands straight while the face looks forward, the left arm follows to the left and the right arm holds a huge ork pistol, pointing to the front like the head. So the whole miniature could be decomposed in three perpendicular axes, more or less like the "XYZ" axes we use in three dimensional math representations.
Well, the conversion idea is pretty simple. We want to break the ork pose lines, we don't want this amount perpendicularity in our piece. We will look for a more diagonal approach, much more appealing.
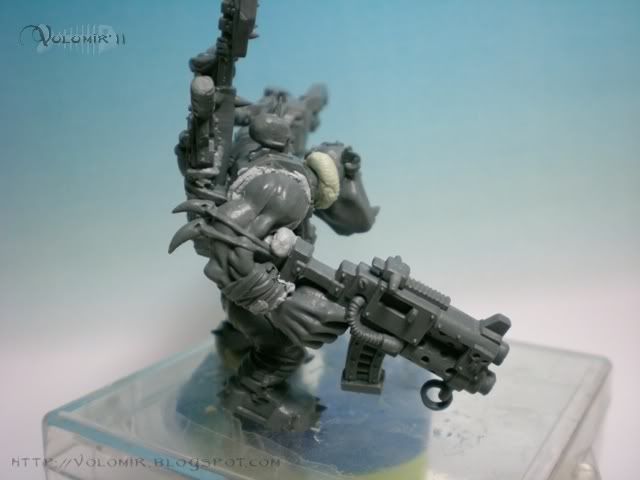
The figurine has 4 pieces, the body and left arm are a whole, and then we have the head, the right arm and the back holding the back pistols and banner. So my first approach will be to move the pieces which are separate from the body, specifically the head and the right arm. I will tilt the head to the left and lower the right arm, and by these very slight and easy changes I will break the 3 axes pose I was talking about.

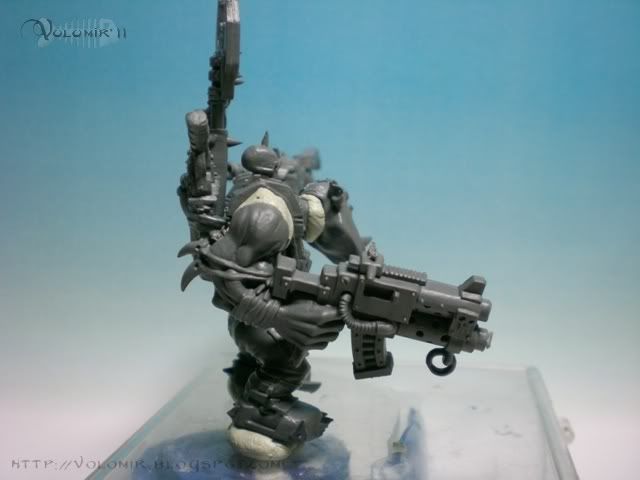

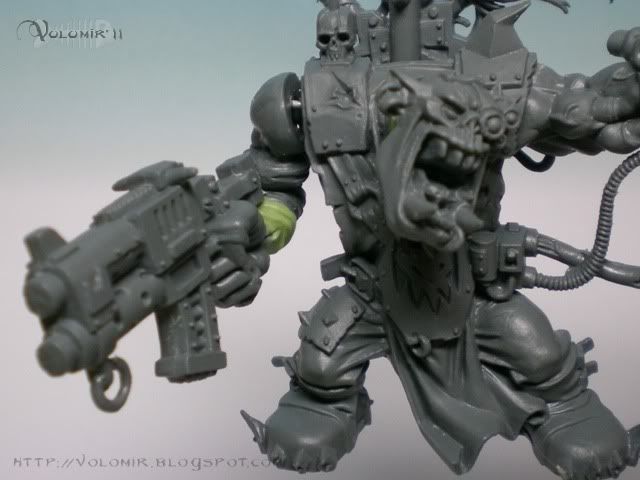
As you can see, the pose of the right arm is very unreal, I would have to use putty to create a false kind of muscle in the shoulder to move the arm so separatedly from the body. I can fix this just by cutting the weapon hand apart from the arm, and let the hand move to find the pose.
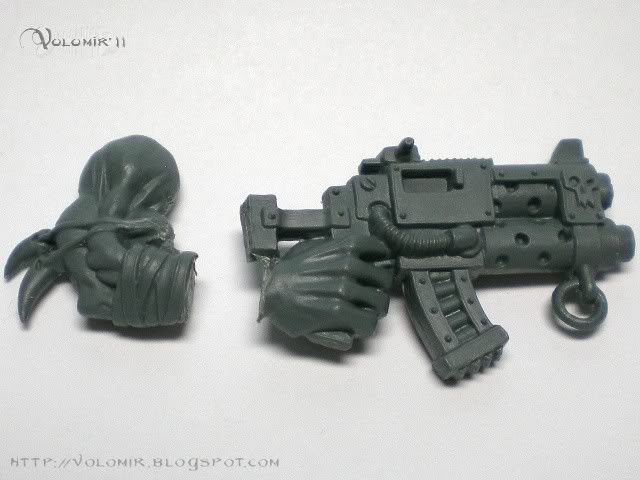

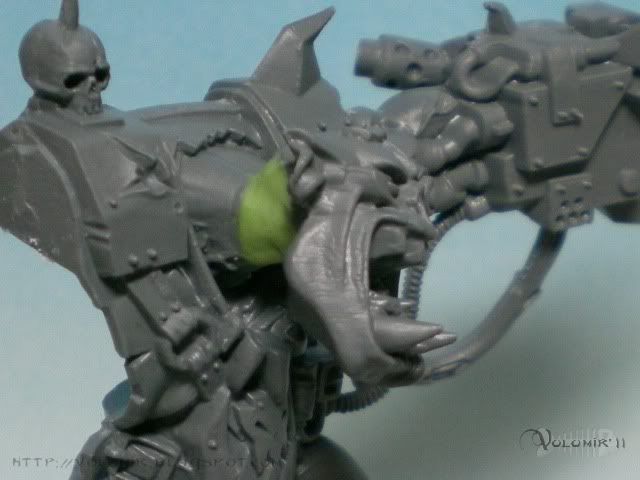
I am happy with the pose as it is, so it's time to do some fixing. A bit of putty on the neck:
I drill a hole on the wrist to fix the hand and weapon position:
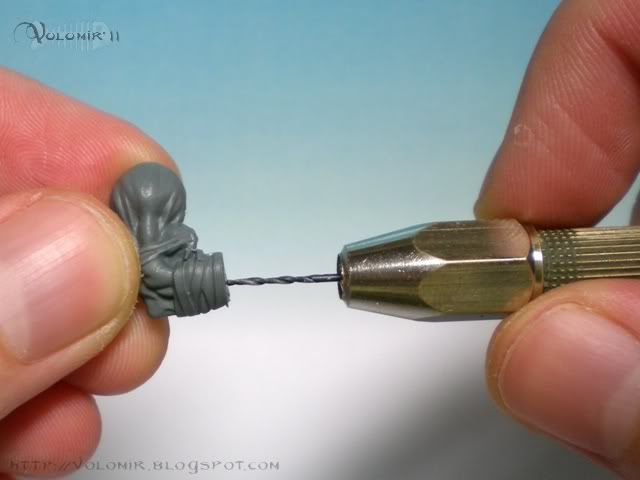
Pin it:
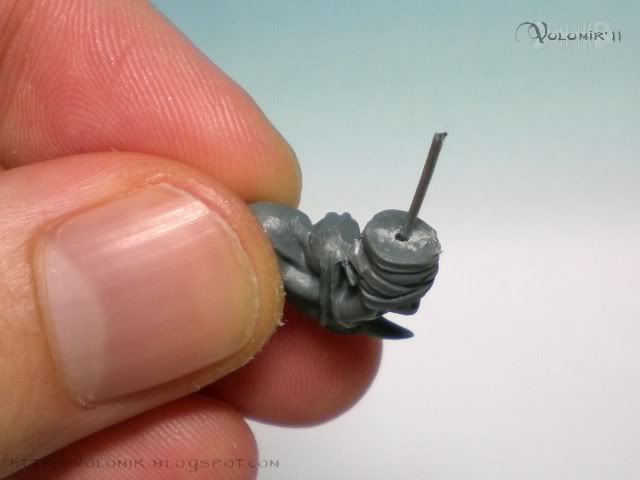
Then sculpt a decent union:

And the same with the shoulder:
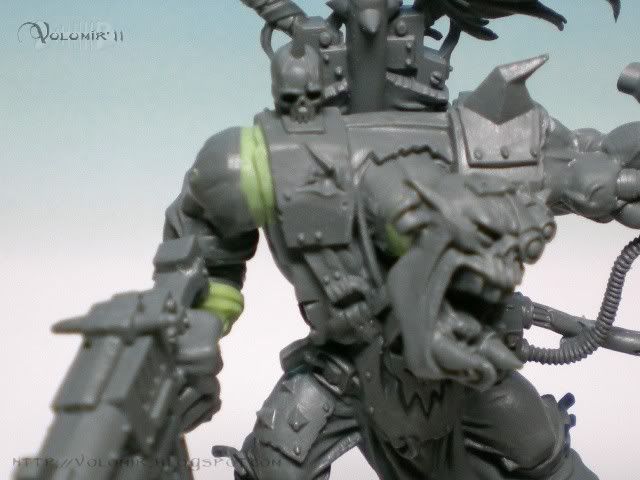
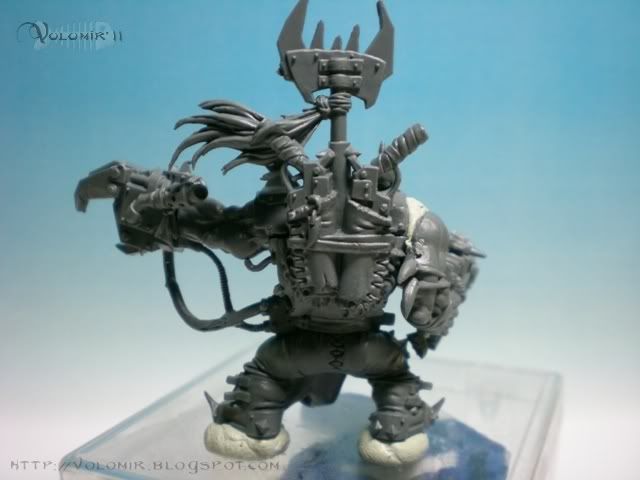
With this done, I see that I can also play with the body. The axis formed by the left arm and shoulders is parallel to the ground. I don't want that, I can also get rid of that ortogonality and make both lines diagonal (ground and arm axis). To do this I do not need to move the feet or any body part, I just need to tilt the whole pose by placing him on a slightly uphill base, like this:

Great then, I think that's it. Let's see the figure on a wood base:
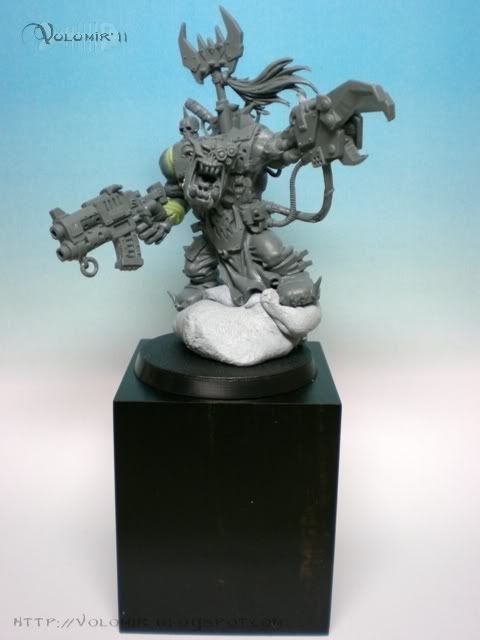
I like it. Let's go for the terrain. I want to do something similar to the Ork Nob I did long time ago, I will just glue together some city rubble, spikes, wire and dead space marine helmets. Altogether with some putty to ensure the feet of the ork are placed correctly and make the diagonal pose I want.

Let's see the Ork on top:
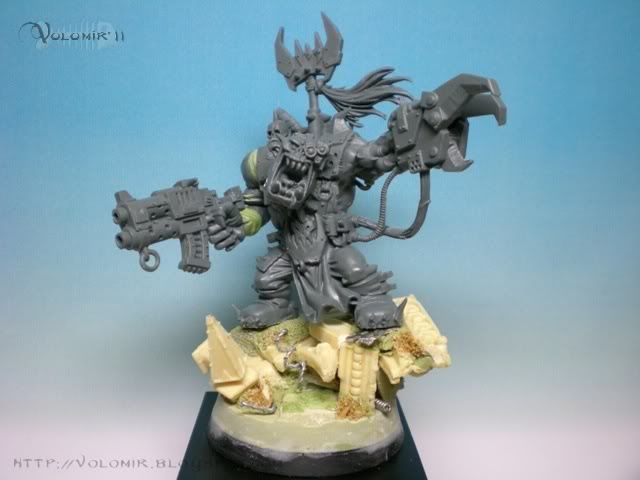
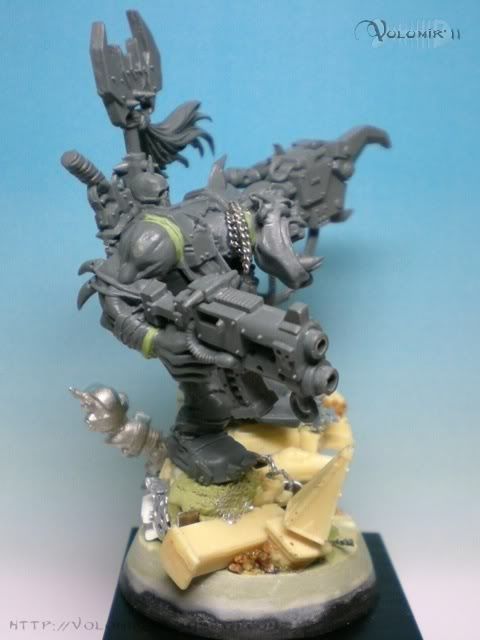

And that's it for now. Next on... a bit of colour!
This project started with the release of the Warhammer 40,000 boxed set (Assault on Black Reach). This box has an amazing number of miniatures and inside we find this cool Ork Warboss which I thought deserved some slight conversion to enhance its beauty.
The original figurine is this one:
As you can see, the pose is very simple, the body stands straight while the face looks forward, the left arm follows to the left and the right arm holds a huge ork pistol, pointing to the front like the head. So the whole miniature could be decomposed in three perpendicular axes, more or less like the "XYZ" axes we use in three dimensional math representations.
Well, the conversion idea is pretty simple. We want to break the ork pose lines, we don't want this amount perpendicularity in our piece. We will look for a more diagonal approach, much more appealing.
The figurine has 4 pieces, the body and left arm are a whole, and then we have the head, the right arm and the back holding the back pistols and banner. So my first approach will be to move the pieces which are separate from the body, specifically the head and the right arm. I will tilt the head to the left and lower the right arm, and by these very slight and easy changes I will break the 3 axes pose I was talking about.
As you can see, the pose of the right arm is very unreal, I would have to use putty to create a false kind of muscle in the shoulder to move the arm so separatedly from the body. I can fix this just by cutting the weapon hand apart from the arm, and let the hand move to find the pose.
I am happy with the pose as it is, so it's time to do some fixing. A bit of putty on the neck:
I drill a hole on the wrist to fix the hand and weapon position:
Pin it:
Then sculpt a decent union:
And the same with the shoulder:
With this done, I see that I can also play with the body. The axis formed by the left arm and shoulders is parallel to the ground. I don't want that, I can also get rid of that ortogonality and make both lines diagonal (ground and arm axis). To do this I do not need to move the feet or any body part, I just need to tilt the whole pose by placing him on a slightly uphill base, like this:
Great then, I think that's it. Let's see the figure on a wood base:
I like it. Let's go for the terrain. I want to do something similar to the Ork Nob I did long time ago, I will just glue together some city rubble, spikes, wire and dead space marine helmets. Altogether with some putty to ensure the feet of the ork are placed correctly and make the diagonal pose I want.
Let's see the Ork on top:
And that's it for now. Next on... a bit of colour!
Thursday, March 10, 2011
WIP: High Elves Sea Guard part 6
Previously on... WIP: High Elves Sea Guard
The shields were very fun to paint.
We start off with the base grey/white on the shield, so I basecoat the star in Turquoise. Notice the gem was painted previously.

Now I give strong shadows on the lower part of the star spikes, with Dark Green and a bit of Blue Ink from Andrea.

I outline the whole star with a mixture of Dark Green, Red and Blue Inks from Andrea. As you can see the outlining is not perfect, but that's because the relief I did on the shields is quite irregular, so now I try to fix this by modelling them with colours (which means creating the sensation of volumes which aren't there by using paint).

So now I fill in the gaps of irregularities with more turquoise.

Some lighting on the star spikes which receive the more direct sunlight (basicly, the spikes in the middle of the star).

So that's all the work on the star. I pass on to the back freehand on the shield. (Notice the following photos are from another elf, thus the difference in contrast and colours). First I paint roughly and slightly the shape which will serve me as a guide.

Same with the inner blue lines.

Now that I'm satisfied with the drawing, I insist on the lines I made, to make them final.

Take a look at another shield.

And that's all on the shields. Let's pass on to the faces.
First, basecoat of Base Skin 2 from Andrea Color Skin Set.

As this is quite a quick process I won't show you all the steps. Just lighting using the base colour adding a bit of Ice Yellow from Vallejo, and the shadows done adding Shadow Skin 2 from Andrea Color Skin Set. Also, light spots of pure white which will give definition to the face, and details, such as teeth, using white but not pure. Mixed with Ice Yellow for example.

WIP: High Elves Sea Guard part 7
The shields were very fun to paint.
We start off with the base grey/white on the shield, so I basecoat the star in Turquoise. Notice the gem was painted previously.
Now I give strong shadows on the lower part of the star spikes, with Dark Green and a bit of Blue Ink from Andrea.
I outline the whole star with a mixture of Dark Green, Red and Blue Inks from Andrea. As you can see the outlining is not perfect, but that's because the relief I did on the shields is quite irregular, so now I try to fix this by modelling them with colours (which means creating the sensation of volumes which aren't there by using paint).
So now I fill in the gaps of irregularities with more turquoise.
Some lighting on the star spikes which receive the more direct sunlight (basicly, the spikes in the middle of the star).
So that's all the work on the star. I pass on to the back freehand on the shield. (Notice the following photos are from another elf, thus the difference in contrast and colours). First I paint roughly and slightly the shape which will serve me as a guide.
Same with the inner blue lines.
Now that I'm satisfied with the drawing, I insist on the lines I made, to make them final.
Take a look at another shield.
And that's all on the shields. Let's pass on to the faces.
First, basecoat of Base Skin 2 from Andrea Color Skin Set.
As this is quite a quick process I won't show you all the steps. Just lighting using the base colour adding a bit of Ice Yellow from Vallejo, and the shadows done adding Shadow Skin 2 from Andrea Color Skin Set. Also, light spots of pure white which will give definition to the face, and details, such as teeth, using white but not pure. Mixed with Ice Yellow for example.
WIP: High Elves Sea Guard part 7
Monday, March 7, 2011
Éowyn, Sword of Rohan
This is my painted version of Éowyn, which I decided to paint because of an agreement made with my friend Elías Alonso (Morsa). He would paint the same figure, using the same colours, but distributing them differently. I used red for the hair, green for the clothes and purple for the vest. Elías on the contrary used red for the clothes, green for the vest and purple for the hair. Anyway, both versions turned out really fine. Elías' one even won Gold on GD Spain 2009.
Link to coolminiornot: http://coolminiornot.com/273298

Link to coolminiornot: http://coolminiornot.com/273298
Subscribe to:
Posts (Atom)